Deploying Node.js with MongoDB Application on AWS EC2 involves several steps, from creating an AWS account to setting up your server and deploying your application. This guide will walk you through the entire process, ensuring you can get your application up and running on AWS EC2 efficiently.ts
Table of Contents
Creating an AWS Account
Visit the AWS Website
Go to AWS’s official website.
Sign Up for an AWS Account
Click on the “Create a Free Account” button.Follow the prompts to enter your email address, password, and AWS account name.
Enter Payment Information
Provide your payment details. AWS offers a free tier with limited resources, but you still need to enter billing information.
Verify Your Identity
AWS will ask you to verify your phone number by sending a code via SMS.
Select a Support Plan
Choose the Basic Support plan (free) or another plan based on your needs.
Complete the Setup
Once you complete these steps, you’ll receive a confirmation email, and your AWS account will be ready to use.
Setup EC2 server
VMs on AWS are called EC2 Servers
EC2 stands for Elastic compute Version 2.
Elastic– Can increase/decrease the size of the machineCompute– It is a machine
Search for ec2 and click on EC2(Virtual Servers in the Cloud)

Launch an Instance
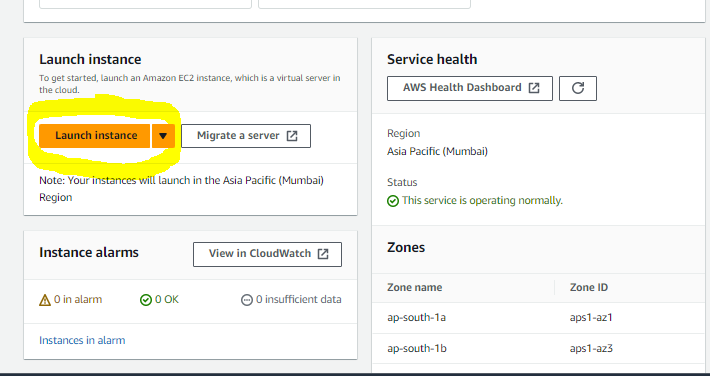
After click on Ec2 You will see Lauch an Instance as seen in the image below and click on it to create a fresh instance.
Select Operating System and Instance Type
After lanching an instance select Ubuntu in the os and t2.mico instance type Note that you can select a large system as per requirements today in this tutorial we’ll be seleting t2.micro as it is free for first 12 months.

Configure the EC2 server and create .pem file to access your server from your shell
In the network settings select Create security group and tick mark all the buttons.

Then click on create new keypair add keypair name like myblog etc. Use name on your own and check RSA and .pem and click on create keypair button after this a file will be downloaded on you computer
This .pem file is sensitive file which is used for accessing your EC2 server so keep it safe on your computer.
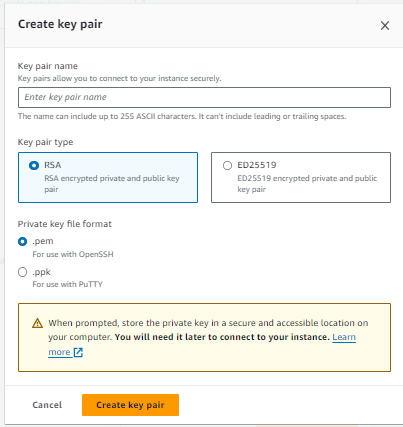
After configuration of our EC2 server click on launch instance button on bottom left. Wait for instance to be launch.

After launch is successful you will see you instance in your EC2 dashboard wait for about 2-3 mins to be initilized.

Connect to your server
After completing all config open you terminal in you systems and go the directory you save the .pem file. Note: if you are using windows make sure you install the git bash https://git-scm.com/downloads.


If your are in the directory you dont need to add path just write ssh -i your-keypair.pem ubuntu@yourpublic ipv4-IP (copy it from your ec2 instance )
you will see the following if you successfully ssh into your server.
Setting Up the Server
Update and Install Required Packages
After connecting to your instance, update your package list and install necessary tools: write the following commands in your shell one by one.
sudo apt update
sudo apt upgrade -y
sudo apt install -y nodejs npm
Install MongoDB
Follow the official MongoDB installation instructions for Ubuntu or Amazon Linux. For Ubuntu, the commands are:
wget -qO – https://www.mongodb.org/static/pgp/server-4.4.asc | sudo apt-key add –
echo “deb [ arch=amd64 ] https://repo.mongodb.org/ubuntu focal 10gen” | sudo tee /etc/apt/sources.list.d/mongodb-org-4.4.list
sudo apt update
sudo apt install -y mongodb-org
Start MongoDB:
sudo systemctl start mongod
sudo systemctl enable mongod
Deploying Your Node.js Application
Clone Your Repository
If your code is hosted on GitHub, clone it to your EC2 instance:
git clone https://github.com/yourusername/your-repo.git
cd your-repo
Install Dependencies
Navigate to your project directory and install the necessary dependencies:
npm install
Configure Your Application
Update your application configuration to connect to the local MongoDB instance. Modify your config.js or .env file with the MongoDB connection string:
Create .env file in you project directory:
sudo nano .env (add all your envireonment variables that your project depend upon e.g PORT,MONGO URL etc)
Start Your Application
Run your Node.js application:
npm start
To ensure your application continues running after you disconnect, use a process manager like PM2:
sudo npm install -g pm2
pm2 start app.js (name is optional you can also give pm2 start “startmyserver”)
pm2 startup
pm2 save
Review your deployement
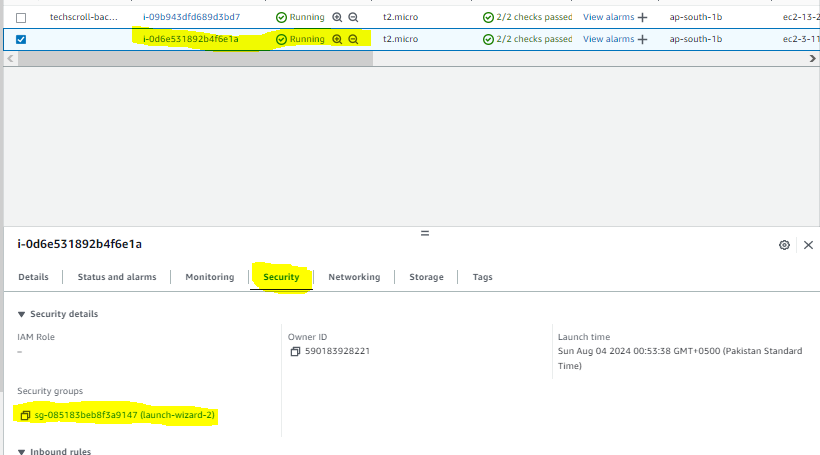
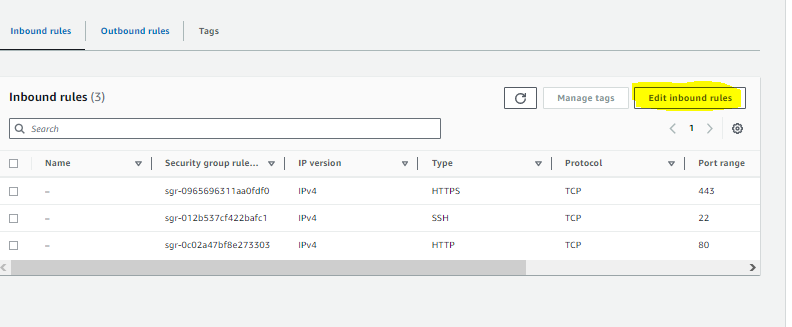
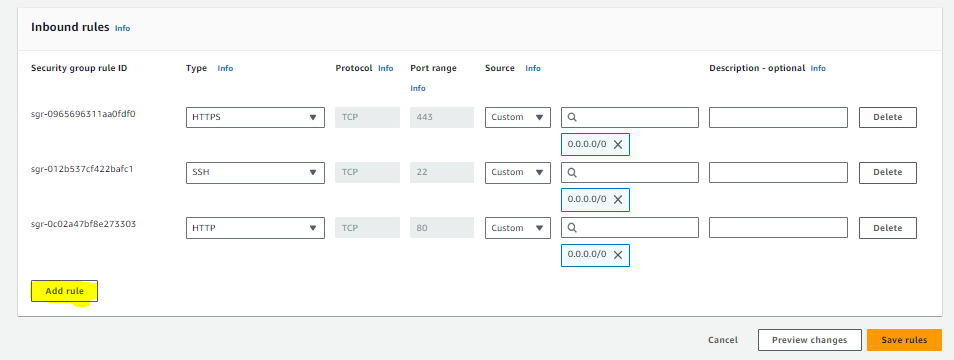
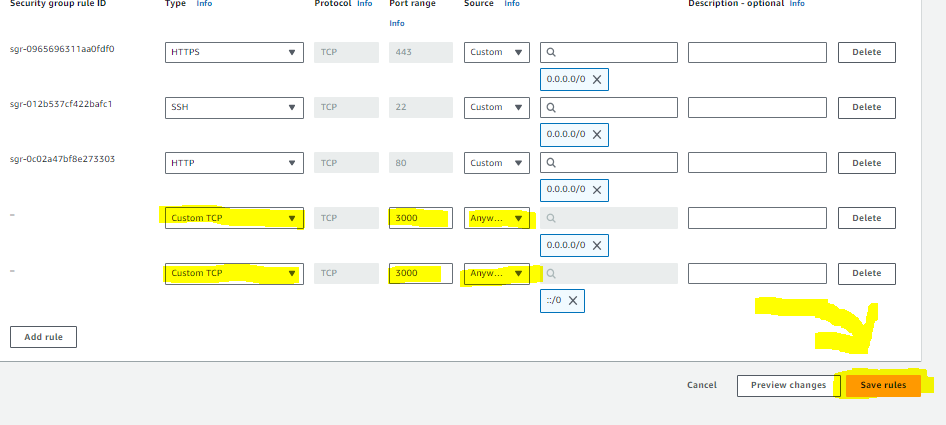
Now to go AWS dashboard and go to your EC2 instances click on your instance and in below settings click on security then click on security groups ,click on edit in bound rules add 2 new rules select custom TCP your PORT and Anywhere ipv4 adresss and in the other one select any ipv6 address. as shown in the image below.
Ensure your Application is running
Go to your browser and write your public ip:your port e.g 12.45.23.11:3000
Configure Nginx
To serve your application through Nginx, install Nginx and configure it as a reverse proxy:
Install Nginx
sudo apt install -y nginx
Configure Nginx
Create a new configuration file in /etc/nginx/sites-available/:
sudo nano /etc/nginx/sites-available/myapp
Add the following configuration: note: add your own IP and PORT
server {
listen 80;
server_name your-domain-or-public-ip;
location / {
    proxy_pass http://localhost:3000;
    proxy_set_header Host $host;
    proxy_set_header X-Real-IP $remote_addr;
    proxy_set_header X-Forwarded-For $proxy_add_x_forwarded_for;
    proxy_set_header X-Forwarded-Proto $scheme;
}
}
Enable the configuration and restart Nginx:
sudo ln -s /etc/nginx/sites-available/myapp /etc/nginx/sites-enabled/
sudo systemctl restart nginx
Verify Your Deployment
Open a web browser and navigate to your EC2 instance’s public IP or domain name. You should see your Node.js application running. Now access you ip in the browser without defining the port.
Conclusion (Deploying Node.js with MongoDB Application on AWS: Complete Tutorial for Developers)
You’ve successfully created an AWS account, set up an EC2 instance, installed MongoDB, deployed your Node.js application, and optionally configured Nginx. With this setup, you can now manage and scale your application as needed on AWS. If you encounter any issues or need further customization, AWS documentation and community forums can provide additional guidance.



Pingback: 5 Beginner-Friendly HTML CSS And JavaScript Projects To Boost Your Skills - ModernTechFeed
Pingback: Best Laptops For Students In 2024: Top 5 Picks For College And High School - ModernTechFeed
Pingback: Top 10 Must-Read Books For Web Developers In 2024: Essential Reads For Coding Success - ModernTechFeed
Pingback: How To Deploy Express Js App For Free - ModernTechFeed
Pingback: 5 Best Online IDEs In 2024 For Modern Development - ModernTechFeed
Pingback: 5 JavaScript Libraries To Use For Machine Learning In 2024 - ModernTechFeed