Table of Contents
Deploy Express js app can be very straightforward. In this guide, I will show you how to deploy your app for free using Render.com. Render simplifies the deployment process, making it accessible even for beginners. Let’s go through the setup and deployment process.
Step 1: Prepare Your Application
Before deploying, ensure your Express.js application is ready for production:
- Set Up Environment Variables: Create a
.envfile in your project root to securely store configuration settings like API keys and database URLs. - Configure
package.json: Ensure thepackage.jsoninclude astartscript to run your application. For example: also given in the picture below
"scripts": {
  "start": "node index.js"
}

Step 2: Set Up Your Render Account
- Create an Account: Visit Render.com and sign up for a free account if you don’t already have one.
- Verify Your Email: Follow the verification link sent to your email to activate your account.
- Log In: Once verified, log in to your Render account.
Just signup through github will ease your process.

Step 3: Create a New Web Service
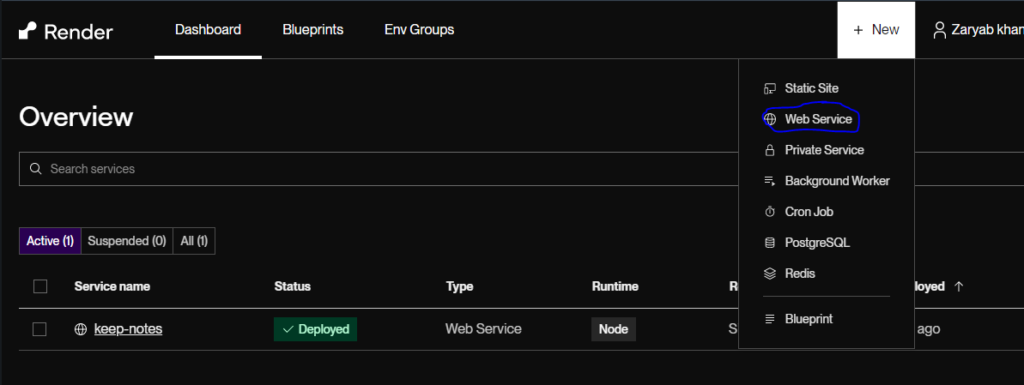
- Start a New Web Service: After logging in, navigate to the Render dashboard click “New” and then select “Web Service” to begin the deployment setup.

Step 4: Connect Your Git Repository
- Choose a Repository: Render supports GitHub, GitLab, and Bitbucket. Select the repository service where your Express js code is hosted and authenticate with your account.
- Select Your Repository: Choose the repository that contains your Express.js application code.

Note: If you are new to render.com then they will ask for payment information make sure to fill in the payment details this will not charge you in this guide we will be using only free resources and your account must have a 2 to 3-dollar balance just for confirmation.
Step 5: Configure Deployment Settings
- Set Up Build and Start Commands:
- Build Command: You can usually leave this empty for Node.js applications.
- Start Command: Enter
npm startoryarn startto start your application.
- Select Your Region: e.g India etc
- Instance Types: select the Hobby projects that are free instance.
- Add Environment Variables: In the “Environment” section, add any necessary environment variables your app requires, such as database URLs or API keys.
- Deploy Web Service: Click on the deploy web service button at the end. The example images below go through the images.


Step 6: Deploy Your Application
- Initiate Deployment: Click “Create Web Service” to start the deployment process. Render will handle dependency installation, build, and start your application.
- Monitor the Process: Watch the deployment logs for updates and to ensure everything is proceeding correctly.

Step 7: Access Your Live Application
- Visit the URL: Once the deployment is complete, Render provides a URL where your application is live. Click on the link to view your deployed Express.js app.
- Verify Functionality: Make sure your application is functioning correctly in the live environment.

Conclusion
Deploying an Express.js application for free on Render.com is very simple and straight forward by following the our instructions you can easily deploy your express server on render.com make sure that your project is running correctly on locahost to produce better results.happy coding.
For additional insights on related topics, check out these resources:
- Top 10 Must-Read Books for Web Developers in 2024: Enhance your development skills with these essential books.
- Deploying Node.js with MongoDB Application on AWS: Learn about deploying a Node.js app with MongoDB on AWS for a more comprehensive deployment solution.
FAQs
1. Can I deploy other Node.js applications on Render? Yes, Render supports various Node.js applications, not just Express.js.
2. Is there a cost associated with deploying on Render.com? Render offers a free tier with generous limits, making it ideal for small projects and personal use.
3. How can I update my deployed application? Push changes to your Git repository, and Render will automatically redeploy your updated application.
4. Can I use a custom domain with Render? Yes, Render allows you to set up custom domains for your applications.
5. What should I do if my deployment fails? Review the deployment logs for errors, verify your environment variables, and check your application configuration.


